Copy File Task
To save the output as a file on the network, the “Copy File” task must be added as an available task after the Process and Save task. The Copy File Task allows you to copy the source file (the variable mentioned above - ProcessFileName) to a destination on the network using standard file naming conventions. The destination directory must have been identified in the MAP Server Configuration Tool (by your MAPS Administrator) as a directory available to MAPS applications. See your MAPS Administrator to obtain the destination directory where you can save files.
/edit copy task.png)
For example, to save the output file named BandedReport.pdf on the c:\reports\directory on a MAP Server named mapsprod, enter the following in the Destination File field: \\mapsprod\c$\reports\BandedReport.pdf. As mentioned above, the c:\reports directory on the MAP server must have been identified in MAPS as the directory to store files.
Using an Argos variable in the Destination File Name
You can also use an expression to create the Destination File Name by clicking the ellipsis to the right of the Destination File field (see above figure). This brings up the Edit Text dialog box shown below.
/copy file task.png)
Click the expression icon ![]() to bring up the Expression Builder shown below. Within this dialog you can build expressions using Argos functions, Argos system variables, and database fields by clicking the icons shown below.
to bring up the Expression Builder shown below. Within this dialog you can build expressions using Argos functions, Argos system variables, and database fields by clicking the icons shown below.
/expression builder - annotated.png)
For example, to create a file name consisting of the Banded Report name followed by .pdf extension, use the Expression Builder to create the expression. The Argos System Variable $Report.Name contains the Report name. Selecting the variables icon ![]() displays the “Pick a variable” dialog where you can select System and Argos variables.
displays the “Pick a variable” dialog where you can select System and Argos variables.
/pick a variable.png)
Expand the $Report System variable and select Name. Click OK, and complete the following expression.
\\mapsprod\c$\reports\%%:$Report.Name + '.pdf'%%
The Report Name and extension is appended to the destination directory.
After clicking OK, the completed Destination File name is displayed in the “Edit Copy Task” dialog below. Click OK to conclude.
/edit copy task 2.png)
Note: Any variables used in the file name must be surrounded by %% characters. If you use the expression builder to construct the filename, the %% will be added automatically.
Using dates in the Destination File Name
You may want to include the date the scheduled report was run in the Destination File Name. The Argos Now() function returns today’s date and can be used in the expression to build the file name. However, since the Now() function returns the date with slash characters (which aren’t allowed in file names), you must strip the slashes to build a valid file name. The expression below will build the file name including today’s date with slashes removed. The FormatDate function is used to remove slashes from the date obtained from the Now() function:
\\mapsprod\c$\reports\%%FormatDate(Now(),”yyyymmdd”)%%.pdf
The saved file name will then be named yyyymmdd.pdf
Use of Source File Name
In the above examples, the default Source File name (ProcessFileName) was used throughout the example. If you are only scheduling one report it is not necessary to change the Source File name. However, if your schedule includes several reports with output to be saved, you will need to assign a Source File name (in the Process Options dialog) to each of the reports. Then in the “Edit Copy Task” dialog (see above figure), the corresponding Source File name is entered.
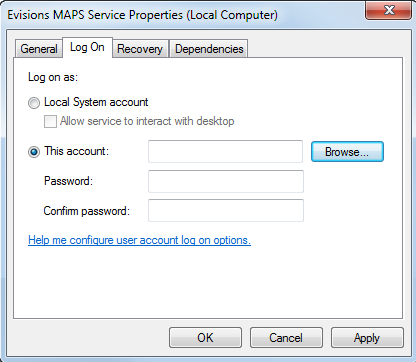
Note: the Evisions MAPS Service user will also need to have write permission to the directory that the file will be placed in. This user can be found by navigating to Services on the Server hosting MAPS, and then to the Evisions MAPS Service Properties dialog.

The user and their permissions will be specified under the This Account field, under the Log On tab.

Return to Editing Schedules - Tasks